Table of contents
The previous blog was always generated using pelican. Recently, I want to switch to hugo for a try. Here, the author lists some minor issues for pure record.
Embed artalk comments in the blog and configure artalk’s adaptive night mode
Artalk itself provides the Artalk.setDarkMode interface, enabling it to monitor the relevant memory segments of the page and adaptively make light and dark color changes.
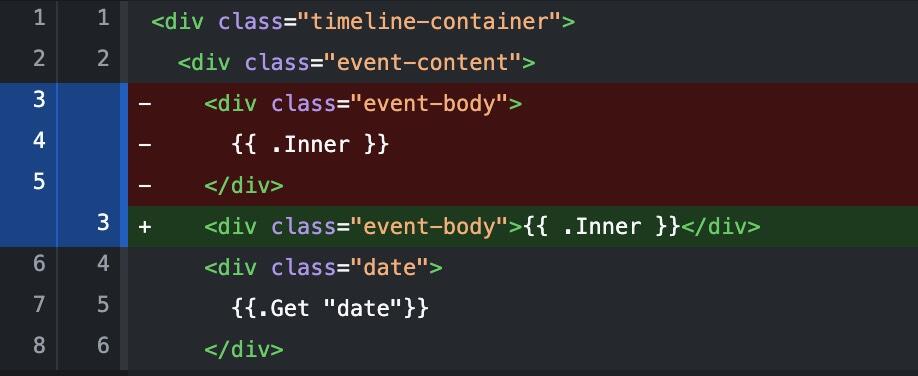
But actually, there is a problem here. Some themes come with buttons for switching between day and night modes. But when switching, the actual value of the memory monitored by artalk doesn’t change. Here is a modification reference:
| |
You need to insert this snippet into the script of the artalk comment’s shortcode. Actually, regarding this modification, I also made several versions before barely synchronizing the colors. As a layman in front-end, modifying others’ front-end projects is really a headache.
For this, you can refer to the following posts for more:
- Practice of Automatic Following and Manual Switching of Dark Mode Adaptation for Web
- artalk Source Code Reference
Add build action: deploy on commit in gitea
TODO
Add more templates
Create a new template leetcode.md in the archetypes directory for the convenience of generating series articles directly using the template later.
| |
The content of the leetcode.md file can be as follows:
| |
At this time, you can use the following command to create a new series article:
| |
Hugo mod configuration
This article refers to:
First, run the following command in the site project directory to generate the go.mod file
| |
Then, modify the hugo.toml file and add the mod you need to import. The example is as follows:
| |
Finally, execute the following command to establish the dependency relationship:
| |
After establishing the relationship, we can use the code of mod in markdown. If you need to update the dependency, you need to modify hugo.toml first, and then execute the following command.
| |
Blog renewal
Fell in love with a modified theme hugo-themes-stacked, but since I am also using a self-modified version, I don’t really want to change this place for the moment. Maybe I can spare some time for a complete adaptation later.
The migration has been completed at present.
Reference: [1]. https://go.md3.cn/N3oNd
Some useless knowledge points
When writing shortcode, we often see some {{- with $page -}}... {{end}} similar with:end tags. The purpose is to set the context within this statement as .
Those dramatic bugs of Hugo
How to obtain the current file path in a multilingual project? For this function, currently, there is no variable provided by Hugo that can be directly obtained. I used the following method for concatenation:
| |
We may see in some places that they will directly use the following method to obtain:
| |
But this address is actually not suitable for the file structure with multiple languages. Even more strangely, if the correct file is not found in this place, it will traverse the entire content for fuzzy matching without reporting an error. It’s really the strangest implementation I’ve ever seen. The method I gave is only valid when your article file structure and configuration are in the following way. You need to configure it according to your own config.
Articles are placed as follows:
| |
Configuration is as follows:
| |
Those deprecated features of Hugo
This warning message indicates that in Hugo version v0.123.0, data.GetJSON has been deprecated and will be removed in future versions. It is recommended to use resources.Get or resources.GetRemote combined with transform.Unmarshal as alternatives.
The following is an explanation of these alternative methods:
resources.Get: It is used to obtain local resource files. For example, if a JSON file is located in your project directory, you can use this method to read it.resources.GetRemote: It is used to obtain remote resources, such as reading JSON data from a URL.transform.Unmarshal: It is used to unmarshal the obtained resource data (usually a byte array) into a specific structure or other data type for convenient processing in the template.
If you are using data.GetJSON to read a local JSON file, you can try the following alternative:
| |
If it is to obtain JSON data from a remote source:
| |
This can avoid problems in future versions of Hugo and ensure that your template can run normally. Hope this is helpful to you! 😉
It’s so difficult to modify the style
In the AI card above, the width of the initially generated codeblock exceeded the card itself, and there was also a lang tag in the upper right corner, which was very unfavorable for reading. I wanted to modify these places, but I don’t understand front-end very well. So I asked AI and got the following results:
Here are several methods to limit the width of .codeblock not to exceed the outer container:
Method 1: Use CSS Maximum Width (max-width) Property
Suppose the outer container has a specific class name .pe-ai-content, you can set the CSS like this:
| |
Method 2: Use CSS Table Layout
| |
Method 3: Use Flexbox Layout
| |
These methods can ensure that the width of .codeblock does not exceed the width of the outer container, and can also adapt to different screen sizes and layout requirements. You can choose the most suitable method according to the actual situation. 😉
After making random modifications, the effect became more and more chaotic. With my shallow understanding, there might be an error in the size relationship between the two nested divs. I opened the element inspector with the Chrome browser and saw that some of the styles I set were marked as invalid strikethrough. Suddenly, I realized that it must be a conflict with styles in other places. After analyzing, I defined the styles of the inner div element separately in the styles of the outer div, and the styles took effect.
| |
As above, you only need to define some attributes of codeblock within the outer div pe-ai-text to override the global attributes of codeblock. You can see that I also overrode the display attribute of code-lang at the same time.
Strange Phenomena When Nesting Hugo Shortcodes
This article refers to: https://go.md3.cn/B1jzb
When I nested shortcodes, the generated page always had redundant Unescaped html ele. Some previous tutorials taught me to use the <code>{{\%\%}}</code> method to nest shortcodes. But after reading the explanation of another blogger, I understood that it was because Hugo treated part of the web content as code for parsing, which led to errors. The solution is simple:
- Use the
<code>{{<>}}</code>method for the call of the outer layer of the nesting. - Cancel the indentation at
{{.Inner }}in the shortcode definition to avoid Markdown treating it as a code block.


